Klix API
Klix provides unified API for multiple payment methods - card and PSD2 bank payments. Full up-to-date REST API Reference can be found here. OpenAPI document that can be used to generate API client can be found here. In order to call Klix API you should first receive API credentials (Brand ID and Secret Key) from Klix representative.
API usage in single payment scenario
Single payment step-by-step guide
- Get list of payment methods (optional). This API end-point returns name and logo of each payment method available to merchant (Klix Card payments, Citadele and other bank PSD2 payments etc.). Use this list to render a payment methods page on your site.
- Create a purchase by submitting order data to Klix. Once purchase is created link to Klix hosted payment page will be returned as
checkout_urlfield value. After customer is redirected to this page Klix will handle the payment process. - Handle one of possible payment process outcomes:
- If customer payment is successful then callback is sent to merchant server and customer is redirected to successful purchase page specified by merchant. Note that you should consider purchase as successfully paid only after callback is received and purchase status is checked. Note that in case if callback is not used you can call Klix API to get purchase status once customer is redirected back to successful purchase page.
- If customer payment fails for some reason customer is redirected to failed purchase page.
- If cancelled payment redirect URL is specified in purchase creation request then customer will be able to go back to merchant page from Klix payment page. It's preferable to specify checkout/payment method selection page as cancelled payment redirect URL so that customer can make adjustments in shopping cart or choose different payment method.
Single payment request examples
These are simple request examples that illustrate Klix API usage. Always use API Reference as a single source of truth.
Note that <Brand ID goes here> and <Secret key goes here> should be replaced with actual Brand ID and Secret Key received from Klix contact person.
Get list of available payment methods
This operation allows you to retrieve all payment methods available to you at the current time. Note that payment method availability depends upon your agreement with Klix and it can also vary from time to time e.g. some bank payment method can be temporarily unavailable because of planned maintenance down-time. In such a case this bank payment method will be excluded from the available payment method list returned by this API end-point until planned maintenance is over and this payment method is re-enabled. That's one of the examples of why an available payment method list should be retrieved on a regular basis in order to offer only fully functional payment methods to the end-user.
Do not call this API end-point before each purchase initiation since this API end-point is rate limited. Cache available payment methods on server side and call this API end-point not more often than once in a minute.
All payment methods currently supported by Klix are listed here.
Note that this API end-point returns both payment method general availability, availability in country and additional information like human-readable payment method name and logo URI.
curl -X GET \
  'https://portal.klix.app/api/v1/payment_methods/?currency=EUR&brand_id=<Brand ID goes here>' \
  -H 'Accept: application/json' \
  -H 'Authorization: Bearer <Secret key goes here>' \
  -H 'Cache-Control: no-cache' \
  -H 'Connection: keep-alive' \
  -H 'Host: portal.klix.app' \
  -H 'accept-encoding: gzip, deflate' \
  -H 'cache-control: no-cache'
Create available payment methods purchase
This option allows to create a purchase that can be paid using any payment method available to merchant. Customer will be have an option to choose one of available payment methods after redirect to Klix payment page.
curl -X POST \
  https://portal.klix.app/api/v1/purchases/ \
  -H 'Accept: application/json' \
  -H 'Authorization: Bearer <Secret key goes here>' \
  -H 'Cache-Control: no-cache' \
  -H 'Connection: keep-alive' \
  -H 'Content-Type: application/json' \
  -H 'Host: portal.klix.app' \
  -H 'accept-encoding: gzip, deflate' \
  -H 'cache-control: no-cache' \
  -d '{
   "success_callback": "https://your.site/api/successfully-paid-callback-will-be-sent-to-this-end-point",
   "success_redirect": "https://your.site/customer-will-be-redirected-here-in-case-of-successfull-payment",
   "failure_redirect": "https://your.site/customer-will-be-redirected-here-in-case-of-failed-payment",
   "cancel_redirect": "https://your.site/customer-will-be-redirected-here-in-case-customer-decides-to-go-back-to-your-store-during-payment",
   "purchase": {
      "language": "lv",
      "products": [
         {
            "price": 3000,
            "name": "Xiaomi Mi Smart Band 5"
         },
         {
            "price": 100,
            "name": "Screen protector for Xiaomi Mi Smart Band 5"
         }
      ]
   },
   "client": {
      "email": "test@test.com"
   },
   "brand_id": "<Brand ID goes here>",
   "reference": "Your order id"
}'
Create whitelisted payment method purchase
This option allows to create a purchase that can be paid only using specified whitelisted payment method. Most often this option is used to allow purchase to be paid using payment method selected on merchant web-site.
curl -X POST \
  https://portal.klix.app/api/v1/purchases/ \
  -H 'Accept: application/json' \
  -H 'Authorization: Bearer <Secret key goes here>' \
  -H 'Cache-Control: no-cache' \
  -H 'Connection: keep-alive' \
  -H 'Content-Type: application/json' \
  -H 'Host: portal.klix.app' \
  -H 'accept-encoding: gzip, deflate' \
  -H 'cache-control: no-cache' \
  -d '{
   "success_callback": "https://your.site/api/successfully-paid-callback-will-be-sent-to-this-end-point",
   "success_redirect": "https://your.site/customer-will-be-redirected-here-in-case-of-successfull-payment",
   "failure_redirect": "https://your.site/customer-will-be-redirected-here-in-case-of-failed-payment",
   "cancel_redirect": "https://your.site/customer-will-be-redirected-here-in-case-customer-decides-to-go-back-to-your-store-during-payment",
   "purchase": {
      "language": "lv",
      "products": [
         {
            "price": 3000,
            "name": "Xiaomi Mi Smart Band 5"
         },
         {
            "price": 100,
            "name": "Screen protector for Xiaomi Mi Smart Band 5"
         }
      ]
   },
   "client": {
      "email": "test@test.com"
   },
   "payment_method_whitelist": ["klix"],
   "brand_id": "<Brand ID goes here>",
   "reference": "Your order id"
}'
Get purchase information
<Purchase ID> is purchase identifier (field id value) received in purchase creation response.
curl -X GET \
  https://portal.klix.app/api/v1/purchases/<Purchase ID>/ \
  -H 'Accept: application/json' \
  -H 'Authorization: Bearer <Secret key goes here>' \
  -H 'Cache-Control: no-cache' \
  -H 'Connection: keep-alive' \
  -H 'Host: portal.klix.app' \
  -H 'accept-encoding: gzip, deflate' \
  -H 'cache-control: no-cache'
Set purchase expiration date
To define an expiration date for a purchase, you need to configure two parameters in the request:
-
due- specifies the exact expiration time for the purchase. The value must be provided as a Unix timestamp. -
purchase.due_strict- when set to true, the payment will not be accepted after the due timestamp is reached.
curl -X POST \
  https://portal.klix.app/api/v1/purchases/ \
  -H 'Accept: application/json' \
  -H 'Authorization: Bearer <Secret key goes here>' \
  -H 'Cache-Control: no-cache' \
  -H 'Connection: keep-alive' \
  -H 'Content-Type: application/json' \
  -H 'Host: portal.klix.app' \
  -H 'accept-encoding: gzip, deflate' \
  -H 'cache-control: no-cache' \
  -d '{
   "success_callback": "https://your.site/api/successfully-paid-callback-will-be-sent-to-this-end-point",
   "success_redirect": "https://your.site/customer-will-be-redirected-here-in-case-of-successfull-payment",
   "failure_redirect": "https://your.site/customer-will-be-redirected-here-in-case-of-failed-payment",
   "cancel_redirect": "https://your.site/customer-will-be-redirected-here-in-case-customer-decides-to-go-back-to-your-store-during-payment",
   "purchase": {
      "due_strict": true,
      "language": "lv",
      "products": [
         {
            "price": 3000,
            "name": "Xiaomi Mi Smart Band 5"
         },
         {
            "price": 100,
            "name": "Screen protector for Xiaomi Mi Smart Band 5"
         }
      ]
   },
   "client": {
      "email": "test@test.com"
   },
   "payment_method_whitelist": ["klix"],
   "brand_id": "<Brand ID goes here>",
   "reference": "Your order id",
   "due": 1356088289
}'
API usage in recurring payment scenario
Recurring payment step-by-step guide
- Create an initial purchase with recurring flag set to
true(see"force_recurring": truein example) in order to register payment card details for subsequent use in recurring payments. Created purchaseidandcheckout_urlwill be returned in a response. Redirect customer tocheckout_urland Klix will handle the payment process. Store this initial purchaseidon your side as a recurring payment token and use it later on to charge a customer payment card (see<Recurring payment token>placeholder in example). If purchase created in previous step is paid by customer then card details are successfully captured for subsequent use. - Once customer card should be charged in a form of a recurring payment new purchase should be created via API by specifying amount that needs to be charged and transaction description. This time
force_recurringshould befalseor can be omitted at all (see example). In this case only purchaseidreturned in response should be used in next step (see<Purchase id of recurring payment>placeholder in example). Note thatcheckout_urlshould not be used. - Created purchase should be charged via API call. Note that both newly created purchase
idcreated in step 2 and recurring payment token (purchaseid) created in step 1 should be passed to this API end-point (see example).
Recurring payment request examples
These are simple request examples that illustrate Klix API usage. Always use API Reference as a single source of truth.
Note that <Brand ID goes here> and <Secret key goes here> should be replaced with actual Brand ID and Secret Key received from Klix contact person.
Create an initial purchase to register card for subsequent recurring payments
This should be done only once to make initial payment and register customer card for subsequent use.
curl -X POST \
  https://portal.klix.app/api/v1/purchases/ \
  -H 'Accept: application/json' \
  -H 'Authorization: Bearer <Secret key goes here>' \
  -H 'Cache-Control: no-cache' \
  -H 'Connection: keep-alive' \
  -H 'Content-Type: application/json' \
  -H 'Host: portal.klix.app' \
  -H 'accept-encoding: gzip, deflate' \
  -H 'cache-control: no-cache' \
  -d '{
   "force_recurring": true,
   "success_callback": "https://your.site/api/successfully-paid-callback-will-be-sent-to-this-end-point",
   "success_redirect": "https://your.site/customer-will-be-redirected-here-in-case-of-successfull-payment",
   "failure_redirect": "https://your.site/customer-will-be-redirected-here-in-case-of-failed-payment",
   "cancel_redirect": "https://your.site/customer-will-be-redirected-here-in-case-customer-decides-to-go-back-to-your-store-during-payment",
   "purchase": {
      "language": "lv",
      "products": [
         {
            "price": 700,
            "name": "XYZ service subscription"
         }
      ]
   },
   "client": {
      "email": "test@test.com"
   },
   "brand_id": "<Brand ID goes here>",
   "reference": "Your order id"
}'
Create recurring payment
This should be done for each recurring payment (e.g. each month).
curl -X POST \
  https://portal.klix.app/api/v1/purchases/ \
  -H 'Accept: application/json' \
  -H 'Authorization: Bearer <Secret key goes here>' \
  -H 'Cache-Control: no-cache' \
  -H 'Connection: keep-alive' \
  -H 'Content-Type: application/json' \
  -H 'Host: portal.klix.app' \
  -H 'accept-encoding: gzip, deflate' \
  -H 'cache-control: no-cache' \
  -d '{
   "success_callback": "https://your.site/api/successfully-paid-callback-will-be-sent-to-this-end-point",
   "purchase": {
      "language": "lv",
      "products": [
         {
            "price": 700,
            "name": "XYZ service subscription fee for December 2020"
         }
      ]
   },
   "client": {
      "email": "test@test.com"
   },
   "brand_id": "<Brand ID goes here>",
   "reference": "Your order id"
}'
Charge customer card as a recurring payment
curl -X POST \
  https://portal.klix.app/api/v1/purchases/<Purchase id of recurring payment>/charge \
  -H 'Accept: application/json' \
  -H 'Authorization: Bearer <Secret key goes here>' \
  -H 'Cache-Control: no-cache' \
  -H 'Connection: keep-alive' \
  -H 'Content-Type: application/json' \
  -H 'Host: portal.klix.app' \
  -H 'accept-encoding: gzip, deflate' \
  -H 'cache-control: no-cache' \
  -d '{
   "recurring_token": "<Recurring payment token>"
}'
API usage in reservation scenario (payment execution separated from authorization)
Reservation step-by-step guide
- Create a purchase by submitting order data and additional
skip_captureflag to Klix indicating card payment authorization separation from payment execution. Once purchase is created link to Klix hosted payment page will be returned ascheckout_urlfield value. Payment identifier returned in purchase creation response should be stored for later use in capture or release requests. After customer is redirected to this page Klix will capture customer card details and will reserve the funds equal to purchase total amount. - There are two options how to proceed with reservation:
- Capture reserved amount. There's an option to capture either full reserved amount or amount that's smaller than initially reserved amount.
- Release (return to customer) reserved amount.
Automatic release of reserved amount
Reservations are released automatically after 6 days if capture request is not received within this period.
Reservation functionality request examples
These are simple request examples that illustrate Klix API usage. Always use API Reference as a single source of truth.
Note that <Brand ID goes here> and <Secret key goes here> should be replaced with actual Brand ID and Secret Key received from Klix contact person.
Create a reservation purchase
This option allows to create a purchase that will reserve purchase total amount in case of card payment. Store purchase id returned in response to either capture or release funds reserved by this purchase. Redirect customer to checkout_url returned in purchase creation response to allow customer to enter card details. Note that in case of successful reservation purchase status will be changed to "hold" instead of "paid" as in case of regular card payment.
curl -X POST \
  https://portal.klix.app/api/v1/purchases/ \
  -H 'Accept: application/json' \
  -H 'Authorization: Bearer <Secret key goes here>' \
  -H 'Cache-Control: no-cache' \
  -H 'Connection: keep-alive' \
  -H 'Content-Type: application/json' \
  -H 'Host: portal.klix.app' \
  -H 'accept-encoding: gzip, deflate' \
  -H 'cache-control: no-cache' \
  -d '{
   "success_callback": "https://your.site/api/successfully-paid-callback-will-be-sent-to-this-end-point",
   "success_redirect": "https://your.site/customer-will-be-redirected-here-in-case-of-successfull-payment",
   "failure_redirect": "https://your.site/customer-will-be-redirected-here-in-case-of-failed-payment",
   "cancel_redirect": "https://your.site/customer-will-be-redirected-here-in-case-customer-decides-to-go-back-to-your-store-during-payment",
   "purchase": {
      "language": "lv",
      "products": [
         {
            "price": 3000,
            "name": "Xiaomi Mi Smart Band 5"
         },
         {
            "price": 100,
            "name": "Screen protector for Xiaomi Mi Smart Band 5"
         }
      ]
   },
   "skip_capture": true,
   "client": {
      "email": "test@test.com"
   },
   "payment_method_whitelist": ["klix"],
   "brand_id": "<Brand ID goes here>",
   "reference": "Your order id"
}'
Capture funds reserved by previously created purchase
To capture full amount previously reserved by specified purchase no request body should be sent. <Purchase ID> is purchase identifier (field id value) received in purchase creation response.
curl --location --request POST 'https://portal.klix.app/api/v1/purchases/<Purchase ID>/capture/' \
--header 'Content-Type: application/json' \
--header 'Authorization: Bearer <Secret key goes here>'
Capture partial funds reserved by previously created purchase
To capture amount that's smaller than previously reserved amount this new amount should be specified in request. <Purchase ID> is purchase identifier (field id value) received in purchase creation response.
curl --location --request POST 'https://portal.klix.app/api/v1/purchases/<Purchase ID>/capture/' \
--header 'Content-Type: application/json' \
--header 'Authorization: Bearer <Secret key goes here>' \
--data-raw '{
    "amount": 5
}
'
Release funds reserved by previously created purchase
To release funds reserved by Purchase following request should be sent:
curl --location --request POST 'https://portal.klix.app/api/v1/purchases/<Purchase ID>/release/' \
--header 'Content-Type: application/json' \
--header 'Authorization: Bearer <Secret key goes here>'
API usage in recurring payment & reservation scenario
Recurring payment & reservation scenario combines recurring payment and reservation scenarios - after customer performs initial card registration for recurring payments merchant can use this card for reserving initial amount and then either charging exact amount that's not greater than initially reserved amount or releasing reservation.
Recurring payment & reservation step-by-step guide
- Create an initial purchase with recurring flag set to
true(see"force_recurring": truein example) in order to register payment card details for subsequent use in recurring payments. Created purchaseidandcheckout_urlwill be returned in a response. Redirect customer tocheckout_urland Klix will handle the payment process. Store this initial purchaseidon your side as a recurring payment token and use it later on to reserve initial amount (see<Recurring payment token>placeholder in example). If purchase created in this step is paid by customer then card details are successfully captured for subsequent use. - Create a new purchase once recurring purchase amount should be reserved. Additional
skip_captureflag (see example request) should be added in request indicating card payment authorization separation from payment execution. Once purchase is created payment identifier returned in response should be stored for later use in a charge request. In this case only purchaseidreturned in response should be used in next step (see<Purchase id of recurring payment>placeholder in example). Note thatcheckout_urlshould not be used. - Make charge API call to perform actual reservation of recurring payment initial amount. Note that both newly created purchase
idcreated in step 2 and recurring payment token (purchaseid) created in step 1 should be passed to this API end-point (see example). - There are two options how to proceed with recurring payment reservation:
- Capture reserved amount. There's an option to capture either full reserved amount or amount that's smaller than initially reserved amount.
- Release (return to customer) reserved amount.
Recurring payment & reservation request examples
These are simple request examples that illustrate Klix API usage. Always use API Reference as a single source of truth.
Note that <Brand ID goes here> and <Secret key goes here> should be replaced with actual Brand ID and Secret Key received from Klix contact person.
Create an initial purchase to register card for subsequent recurring payments
Create an initial purchase for card registration in a same way it's done in a regular recurring payment scenario.
Create recurring payment for reservation
This should be done for each recurring transaction (e.g. to reserve some predefined amount before electric car charge is started).
curl -X POST \
  https://portal.klix.app/api/v1/purchases/ \
  -H 'Accept: application/json' \
  -H 'Authorization: Bearer <Secret key goes here>' \
  -H 'Cache-Control: no-cache' \
  -H 'Connection: keep-alive' \
  -H 'Content-Type: application/json' \
  -H 'Host: portal.klix.app' \
  -H 'accept-encoding: gzip, deflate' \
  -H 'cache-control: no-cache' \
  -d '{
   "success_callback": "https://your.site/api/successfully-paid-callback-will-be-sent-to-this-end-point",
   "purchase": {
      "language": "lv",
      "products": [
         {
            "price": 5000,
            "name": "Electric car charge"
         }
      ]
   },
   "client": {
      "email": "test@test.com"
   },
   "skip_capture": "true",
   "brand_id": "<Brand ID goes here>",
   "reference": "Your order id"
}'
Reserve recurring payment initial amount
Note that in case of successful reservation recurring purchase status will be changed to "hold" instead of "paid" as in case of regular card payment.
curl -X POST \
  https://portal.klix.app/api/v1/purchases/<Purchase id of recurring payment>/charge \
  -H 'Accept: application/json' \
  -H 'Authorization: Bearer <Secret key goes here>' \
  -H 'Cache-Control: no-cache' \
  -H 'Connection: keep-alive' \
  -H 'Content-Type: application/json' \
  -H 'Host: portal.klix.app' \
  -H 'accept-encoding: gzip, deflate' \
  -H 'cache-control: no-cache' \
  -d '{
   "recurring_token": "<Recurring payment token>"
}'
Capture funds reserved by previously created purchase
Note that after successful capture recurring purchase status is changed to "paid".
Capture partial funds reserved by previously created purchase
Note that after successful capture recurring purchase status is changed to "paid".
Release funds reserved by previously created purchase
Note that after successful capture recurring purchase status is changed to "released".
API usage in bulk payment scenario
A bulk payment is a group of payments to multiple bank accounts (IBANs) which requires only single confirmation from customer.
Typical use case for bulk payment functionality is a product marketplaces where during a checkout customer pays to multiple merchants at once. Bulk payment functionality allows to initiate and confirm these multiple payments as a single payment.
Here is a list of the payment methods that currently support bulk payment functionality:
- citadele_ee_pis
- citadele_lt_pis
- citadele_lv_pis
- seb_ee_pis
- seb_lt_pis
- seb_lv_pis
- swedbank_ee_pis
- swedbank_lt_pis
- swedbank_lv_pis
Bulk payment step-by-step guide
- Sign the agreement with Klix for the usage of bulk payment functionality. Submit the list of creditor IBANs for whitelisting.
- Initiate a bulk payment by providing multiple creditors and amounts.
- Handle a single successful payment callback for each bulk payment.
Bulk payment request examples
These are simple request examples that illustrate Klix API usage. Always use API Reference as a single source of truth.
Note that <Brand ID goes here> and <Secret key goes here> should be replaced with actual Brand ID and Secret Key received from Klix contact person.
Create a bulk payment purchase
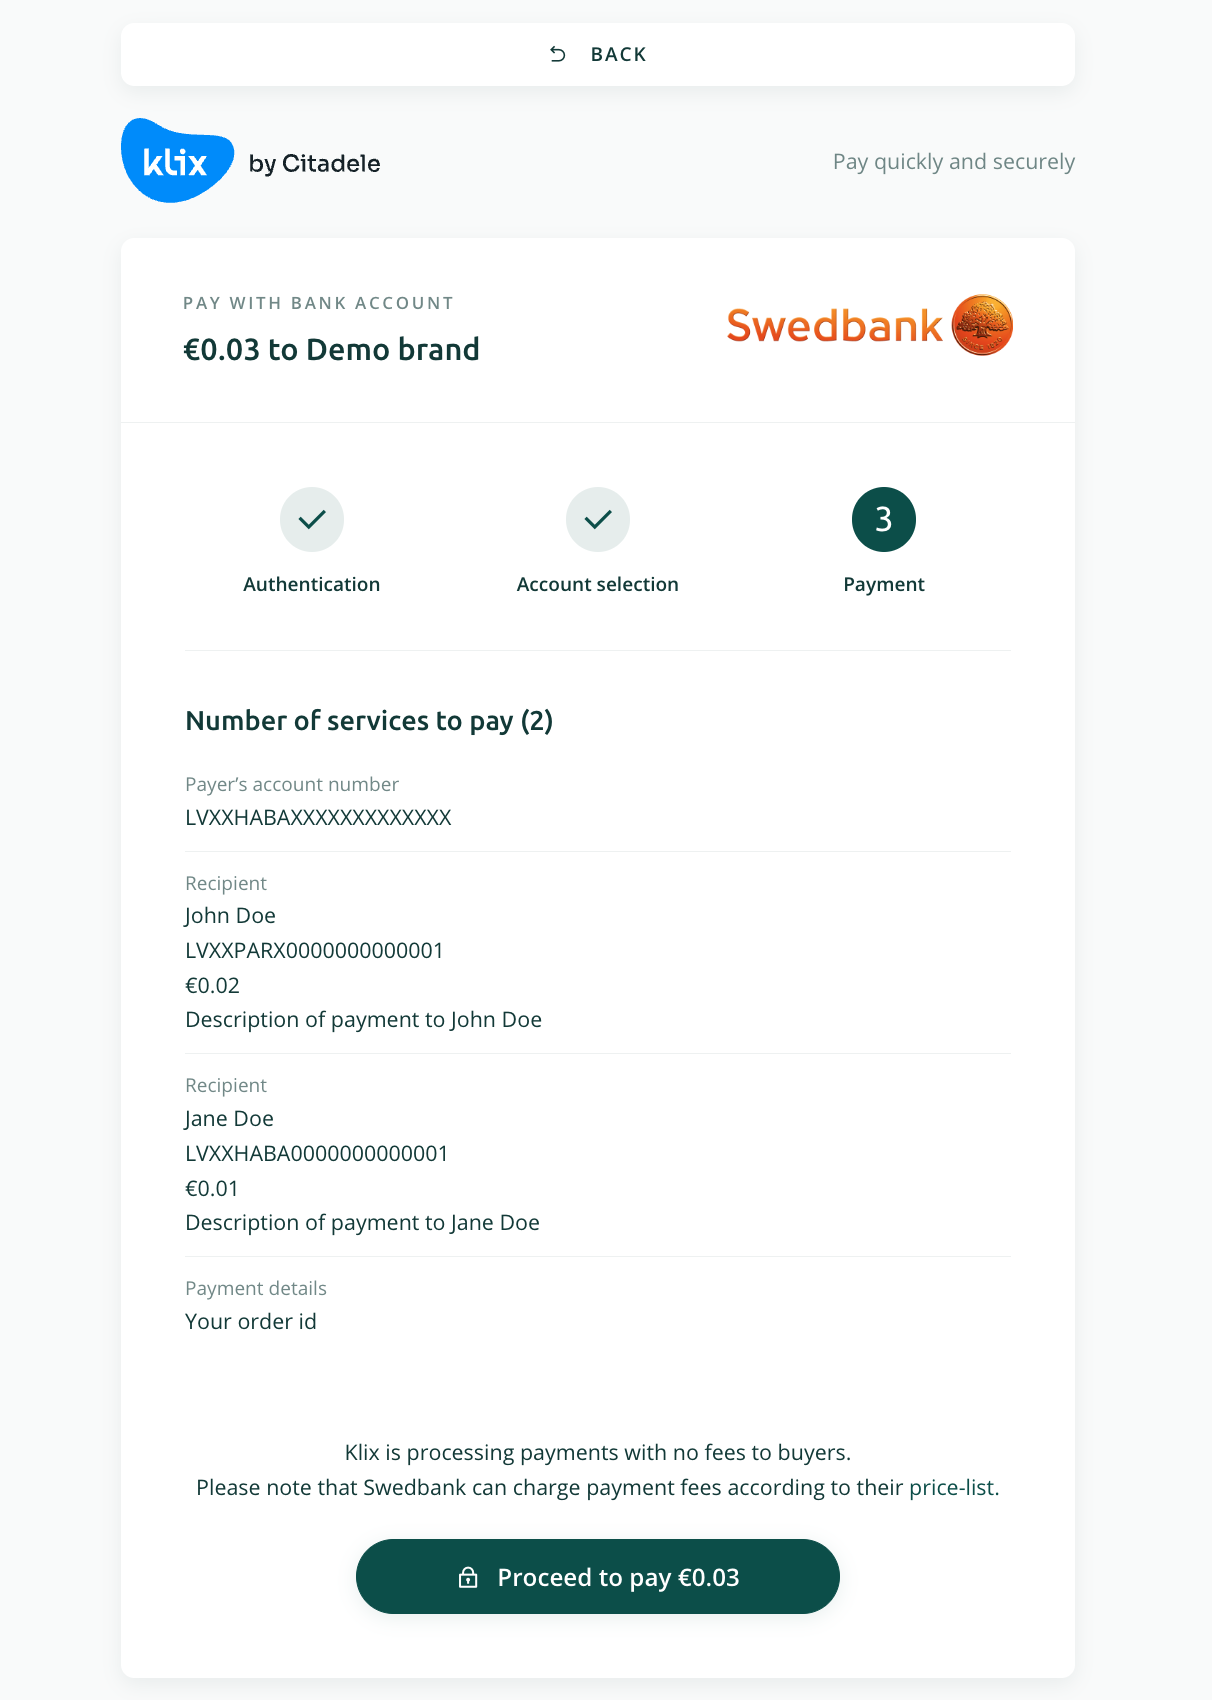
Initiate a purchase by specifying multiple creditors and corresponding payment amounts and descriptions. In the following example Swedbank Latvia bulk payment total amount is 0.03 EUR, and it consists of two payments:
- 0.02 EUR payment to John Doe's IBAN LVXXPARX0000000000001 with a payment description "Description of payment to John Doe"
- 0.01 EUR payment to Jane Doe's IBAN LVXXHABA0000000000001 with a payment description "Description of payment to Jane Doe"
curl -X POST \
  https://portal.klix.app/api/v1/purchases/ \
  -H 'Accept: application/json' \
  -H 'Authorization: Bearer <Secret key goes here>' \
  -H 'Cache-Control: no-cache' \
  -H 'Connection: keep-alive' \
  -H 'Content-Type: application/json' \
  -H 'Host: portal.klix.app' \
  -H 'accept-encoding: gzip, deflate' \
  -H 'cache-control: no-cache' \
  -d '{
    "purchase": {
        "products": [
            {
                "name": "Description of payment to John Doe",
                "price": 2
            },
            {
                "name": "Description of payment to Jane Doe",
                "price": 1
            }
        ],
        "payment_method_details": {
            "pis_bulk_purchase": [
                {
                    "creditor_name": "John Doe",
                    "creditor_iban": "LVXXPARX0000000000001"
                },
                {
                    "creditor_name": "Jane Doe",
                    "creditor_iban": "LVXXHABA0000000000001"
                }
            ]
        }
    },
    "client": {
        "email": "test@test.com"
    },
    "payment_method_whitelist": ["swedbank_lv_pis"],
    "brand_id": "<Brand ID goes here>`",
    "reference": "Your order id"
}'
After redirecting customer to Klix payment page (field checkout_url from init payment response) bulk payment details will be presented.
Note that all creditor IBANs should be whitelisted before bulk payment is initiated. In case at least one of the creditor IBANs is not whitelisted following error message is returned in a purchase initiation response:
{
    "__all__": [
        {
            "message": "Creditor's IBAN 'LVXXPARX0000000000001' is not whitelisted. Please ensure the creditor's IBAN is added to the whitelist and try again.",
            "code": "invalid"
        }
    ]
}
API usage in variable creditor scenario
By default, each Klix bank payment method's creditor account number configuration is set to a static IBAN specified by the merchant in the Klix agreement. If the merchant needs to specify the creditor account number individually during purchase initiation, the variable creditor account functionality should be used. Note that this functionality is disabled by default, and its usage must be explicitly requested.
Variable creditor payment step-by-step guide
- Sign the agreement with Klix for the usage of variable creditor payment functionality. Submit the list of creditor IBANs and creditor names for whitelisting.
- Initiate a purchase by specifying one of the previously whitelisted creditor IBANs and creditor names.
Variable creditor payment request examples
These are simple request examples that illustrate Klix API usage. Always use API Reference as a single source of truth.
Note that <Brand ID goes here> and <Secret key goes here> should be replaced with actual Brand ID and Secret Key received from Klix contact person.
Create a variable creditor payment purchase
Initiate a purchase by specifying one of the previously whitelisted creditor IBANs and names.
curl -X POST \
  https://portal.klix.app/api/v1/purchases/ \
  -H 'Accept: application/json' \
  -H 'Authorization: Bearer <Secret key goes here>' \
  -H 'Cache-Control: no-cache' \
  -H 'Connection: keep-alive' \
  -H 'Content-Type: application/json' \
  -H 'Host: portal.klix.app' \
  -H 'accept-encoding: gzip, deflate' \
  -H 'cache-control: no-cache' \
  -d '{
    "purchase": {
        "products": [
            {
                "name": "Variable creditor account example",
                "price": 5
            },
        ],
        "payment_method_details": {
            "pis_purchase": {
                "creditor": {
                    "iban": "LVXXPARX0000000000001",
                    "name": "John Doe"
                }
            }
        }
    },
    "client": {
        "email": "test@test.com"
    },
    "payment_method_whitelist": ["swedbank_lv_pis"],
    "brand_id": "<Brand ID goes here>`",
    "reference": "Your order id"
}'
As previously mentioned only previously whitelisted IBAN and creditor name can specified in purchase initiation request. In case creditor IBAN or name is not whitelisted following error message is returned in a purchase initiation response:
{
   "creditor": [
      {
         "message": "The provided creditor name or IBAN is not in the whitelist.",
         "code": "invalid"
      }
   ]
}
API usage in native Apple Pay / Google Pay™ scenario
By default, Klix Apple Pay / Google Pay payments are handled fully on Klix side i.e. after Klix purchase initiation customer is redirected to Klix hosted payment page where customer interacts with Apple Pay / Google Pay browser elements. Interaction with Apple Pay / Google Pay JavaScript SDK is done by Klix in this case.
To accept Apple Pay / Google Pay payments directly in your application or website, Klix provides an API end-point that accepts encrypted payment token. In case of native Apple Pay / Google Pay payments there are no redirects to Klix payment page and merchant is responsible for interaction with Apple Pay / Google Pay JavaScript or mobile SDKs.
In order to initiate native iOS Apple Pay payment request merchant should use their own Apple Pay merchant identifier e.g. merchant.lv.merchant1 (also note that 3D Secure capability should be set):
let paymentRequest = PKPaymentRequest()
paymentRequest.merchantIdentifier = "merchant.lv.merchant1"
paymentRequest.supportedNetworks = [.visa, .masterCard]
paymentRequest.merchantCapabilities = .capability3DS
Merchant should also request payment processing certificate signing request (CSR) from Klix support, upload it during merchant identifier registration, download certificate signed by Apple and provide it to Klix support. Note that in case of direct Apple Pay integration in merchant's website using JS SDK, merchant will additionally need to perform the domain verification.
In order to initiate Google Pay payment request following gateway, gatewayMerchantId and merchantId should be specified (also note allowedAuthMethods value):
val paymentDataRequest = PaymentDataRequest.fromJson("""
{
  "apiVersion": 2,
  "apiVersionMinor": 0,
  "allowedPaymentMethods": [
    {
      "type": "CARD",
      "parameters": {
        "allowedAuthMethods": ["PAN_ONLY", "CRYPTOGRAM_3DS"],
        "allowedCardNetworks": ["VISA", "MASTERCARD"]
      },
      "tokenizationSpecification": {
        "type": "PAYMENT_GATEWAY",
        "parameters": {
          "gateway": "klix",
          "gatewayMerchantId": "request_your_gateway_merchant_id_to_klix_support"
        }
      }
    }
  ],
  "transactionInfo": {
    "totalPriceStatus": "FINAL",
    "totalPrice": "1.00",
    "currencyCode": "EUR"
  },
  "merchantInfo": {
    "merchantName": "your_company_name",
    "merchantId": "your_google_merchant_id"
  }
}
""")
Native Apple Pay / Google Pay payment step-by-step guide
- Initiate a payment by specifying either
klix_apple_payorklix_google_payas a whitelisted payment method. - Post Base64 encoded encrypted payment token obtained via Apple Pay / Google Pay SDKs.
Native Apple Pay / Google Pay request examples
These are simple request examples that illustrate Klix API usage. Always use API Reference as a single source of truth.
Note that <Brand ID goes here> and <Secret key goes here> should be replaced with actual Brand ID and Secret Key received from Klix contact person.
Create whitelisted payment method purchase
Pass klix_apple_pay or klix_google_pay as purchase initiation request field payment_method_whitelist value.
Post Base64 encoded encrypted payment token obtained via Apple Pay / Google Pay SDKs
Desired payment method should be posted as a form field pm value, e.g. klix_apple_pay or klix_google_pay. Also include form field s2s with value "true" in request.
Sending Apple Pay payment token
curl --location --request POST 'https://portal.klix.app/p/<Purchase id returned in previous step>/' \
--header 'Authorization: Bearer <Secret key goes here>' \
--form 'pm="klix_apple_pay"' \
--form 's2s="true"'
--form 'token="<Base64 encoded token>"'
Form field token value is Base64 encoded Apple Pay token. See the example of Apple Pay token part that needs to be sent to Klix.
Sending Google Pay payment token
curl --location --request POST 'https://portal.klix.app/p/<Purchase id returned in previous step>/' \
--header 'Authorization: Bearer <Secret key goes here>' \
--form 'pm="klix_google_pay"' \
--form 's2s="true"'
--form 'data="<Base64 encoded token>"'
Form field data value is Base64 encoded Google Pay token. See the example of Google Pay token part that needs to be sent to Klix.
Apple Pay token example
Given payment data obtained from Apple Pay:
{
   "payment": {
      "token": {
         "paymentData": {
            "data": "BgpuZOTAwfvcKLjTeEb2KRx7lzj5ovSFU9dXOeNO8siMVNYR+TyrTgcsR3m2f1joLnpRgi+ThW7Z7uJvBeaQ9o1bsML7dMku7ncs0YCqA0M2Xzc0jTTXiQPdvbw0+kBdJEFGu/Z0qrSlP5QkTuMISwxzLs9ZaZBpgWsuhgKvW4Fg3Ci6igfZPbCqy5isz1M48MGDUBc1Ao3y2uU+2Gg1tGTjUD4dl8CPlLiXFFVKtYt4Ji6pk6vzr1MsOs6h7uT7rT8dbN2oRUnx7k0bhYe1d8sMiM0sT36jvt8ygJUaB0ZRNCIbzh/mUKfj9QYWv203TuiRd/RBNtceRewZsZbRS3aaPdv9J6z+8Is2Jz2lmHuj8VsxBfeY66K3kgL0jOwmF+99Bm53slmF2VPseTonW49ODNPYb7u5tTPTljtFWX7bb/o=",
            "signature": "MIAGCSqGSIb3DQEHAqCAMIACAQExDTALBglghkgBZQMEAgEwgAYJKoZIhvcNAQcBAACggDCCA+MwggOIoAMCAQICCEwwQUlRnVQ2MAoGCCqGSM49BAMCMHoxLjAsBgNVBAMMJUFwcGxlIEFwcGxpY2F0aW9uIEludGVncmF0aW9uIENBIC0gRzMxJjAkBgNVBAsMHUFwcGxlIENlcnRpZmljYXRpb24gQXV0aG9yaXR5MRMwEQYDVQQKDApBcHBsZSBJbmMuMQswCQYDVQQGEwJVUzAeFw0xOTA1MTgwMTMyNTdaFw0yNDA1MTYwMTMyNTdaMF8xJTAjBgNVBAMMHGVjYy1zbXAtYnJva2VyLXNpZ25fVUM0LVBST0QxFDASBgNVBAsMC2lPUyBTeXN0ZW1zMRMwEQYDVQQKDApBcHBsZSBJbmMuMQswCQYDVQQGEwJVUzBZMBMGByqGSM49AgEGCCqGSM49AwEHA0IABMIVd+3r1seyIY9o3XCQoSGNx7C9bywoPYRgldlK9KVBG4NCDtgR80B+gzMfHFTD9+syINa61dTv9JKJiT58DxOjggIRMIICDTAMBgNVHRMBAf8EAjAAMB8GA1UdIwQYMBaAFCPyScRPk+TvJ+bE9ihsP6K7/S5LMEUGCCsGAQUFBwEBBDkwNzA1BggrBgEFBQcwAYYpaHR0cDovL29jc3AuYXBwbGUuY29tL29jc3AwNC1hcHBsZWFpY2EzMDIwggEdBgNVHSAEggEUMIIBEDCCAQwGCSqGSIb3Y2QFATCB/jCBwwYIKwYBBQUHAgIwgbYMgbNSZWxpYW5jZSBvbiB0aGlzIGNlcnRpZmljYXRlIGJ5IGFueSBwYXJ0eSBhc3N1bWVzIGFjY2VwdGFuY2Ugb2YgdGhlIHRoZW4gYXBwbGljYWJsZSBzdGFuZGFyZCB0ZXJtcyBhbmQgY29uZGl0aW9ucyBvZiB1c2UsIGNlcnRpZmljYXRlIHBvbGljeSBhbmQgY2VydGlmaWNhdGlvbiBwcmFjdGljZSBzdGF0ZW1lbnRzLjA2BggrBgEFBQcCARYqaHR0cDovL3d3dy5hcHBsZS5jb20vY2VydGlmaWNhdGVhdXRob3JpdHkvMDQGA1UdHwQtMCswKaAnoCWGI2h0dHA6Ly9jcmwuYXBwbGUuY29tL2FwcGxlYWljYTMuY3JsMB0GA1UdDgQWBBSUV9tv1XSBhomJdi9+V4UH55tYJDAOBgNVHQ8BAf8EBAMCB4AwDwYJKoZIhvdjZAYdBAIFADAKBggqhkjOPQQDAgNJADBGAiEAvglXH+ceHnNbVeWvrLTHL+tEXzAYUiLHJRACth69b1UCIQDRizUKXdbdbrF0YDWxHrLOh8+j5q9svYOAiQ3ILN2qYzCCAu4wggJ1oAMCAQICCEltL786mNqXMAoGCCqGSM49BAMCMGcxGzAZBgNVBAMMEkFwcGxlIFJvb3QgQ0EgLSBHMzEmMCQGA1UECwwdQXBwbGUgQ2VydGlmaWNhdGlvbiBBdXRob3JpdHkxEzARBgNVBAoMCkFwcGxlIEluYy4xCzAJBgNVBAYTAlVTMB4XDTE0MDUwNjIzNDYzMFoXDTI5MDUwNjIzNDYzMFowejEuMCwGA1UEAwwlQXBwbGUgQXBwbGljYXRpb24gSW50ZWdyYXRpb24gQ0EgLSBHMzEmMCQGA1UECwwdQXBwbGUgQ2VydGlmaWNhdGlvbiBBdXRob3JpdHkxEzARBgNVBAoMCkFwcGxlIEluYy4xCzAJBgNVBAYTAlVTMFkwEwYHKoZIzj0CAQYIKoZIzj0DAQcDQgAE8BcRhBnXZIXVGl4lgQd26ICi7957rk3gjfxLk+EzVtVmWzWuItCXdg0iTnu6CP12F86Iy3a7ZnC+yOgphP9URaOB9zCB9DBGBggrBgEFBQcBAQQ6MDgwNgYIKwYBBQUHMAGGKmh0dHA6Ly9vY3NwLmFwcGxlLmNvbS9vY3NwMDQtYXBwbGVyb290Y2FnMzAdBgNVHQ4EFgQUI/JJxE+T5O8n5sT2KGw/orv9LkswDwYDVR0TAQH/BAUwAwEB/zAfBgNVHSMEGDAWgBS7sN6hWDOImqSKmd6+veuv2sskqzA3BgNVHR8EMDAuMCygKqAohiZodHRwOi8vY3JsLmFwcGxlLmNvbS9hcHBsZXJvb3RjYWczLmNybDAOBgNVHQ8BAf8EBAMCAQYwEAYKKoZIhvdjZAYCDgQCBQAwCgYIKoZIzj0EAwIDZwAwZAIwOs9yg1EWmbGG+zXDVspiv/QX7dkPdU2ijr7xnIFeQreJ+Jj3m1mfmNVBDY+d6cL+AjAyLdVEIbCjBXdsXfM4O5Bn/Rd8LCFtlk/GcmmCEm9U+Hp9G5nLmwmJIWEGmQ8Jkh0AADGCAYgwggGEAgEBMIGGMHoxLjAsBgNVBAMMJUFwcGxlIEFwcGxpY2F0aW9uIEludGVncmF0aW9uIENBIC0gRzMxJjAkBgNVBAsMHUFwcGxlIENlcnRpZmljYXRpb24gQXV0aG9yaXR5MRMwEQYDVQQKDApBcHBsZSBJbmMuMQswCQYDVQQGEwJVUwIITDBBSVGdVDYwCwYJYIZIAWUDBAIBoIGTMBgGCSqGSIb3DQEJAzELBgkqhkiG9w0BBwEwHAYJKoZIhvcNAQkFMQ8XDTIzMDUyNDE5Mjc1M1owKAYJKoZIhvcNAQk0MRswGTALBglghkgBZQMEAgGhCgYIKoZIzj0EAwIwLwYJKoZIhvcNAQkEMSIEIPjM2YkgroC2//zhHgmk80KnkLlcyZRVYt38wY8L851RMAoGCCqGSM49BAMCBEcwRQIgJdU2sd49K3cplsoAMppNolR36g5ktefleZu9H4a8UV8CIQDjgkWt5ZD7n9UaHpZsvKgbdktMq6MhG60bRemX8RnqXwAAAAAAAA==",
            "header": {
               "publicKeyHash": "sVJ+hz3Jyb0eKCe276d05QHmUF5K9+HCalzkUBPQ9YE=",
               "ephemeralPublicKey": "MFkwEwYHKoZIzj0CAQYIKoZIzj0DAQcDQgAEOuabaFAe9UQlHceNRNrlhef+lpW/Xuwk/sOmttK0iCt2hJqgqiq/b/ZDN2RjzRlTEXWlFAMkMf6O3f4cxK9tUg==",
               "transactionId": "c82114434378b3372d2c739b91c2d08d3e79038bcd0cff37dbf220a57a9e69cf"
            },
            "version": "EC_v1"
         },
         "paymentMethod": {
            "displayName": "Visa 0224",
            "network": "Visa",
            "type": "debit"
         },
         "transactionIdentifier": "c82114434378b3372d2c739b91c2d08d3e79038bcd0cff37dbf220a57a9e69cf"
      }
   }
}
only payment.token.paymentData internal part needs to be Base64 encoded
{
   "data": "BgpuZOTAwfvcKLjTeEb2KRx7lzj5ovSFU9dXOeNO8siMVNYR+TyrTgcsR3m2f1joLnpRgi+ThW7Z7uJvBeaQ9o1bsML7dMku7ncs0YCqA0M2Xzc0jTTXiQPdvbw0+kBdJEFGu/Z0qrSlP5QkTuMISwxzLs9ZaZBpgWsuhgKvW4Fg3Ci6igfZPbCqy5isz1M48MGDUBc1Ao3y2uU+2Gg1tGTjUD4dl8CPlLiXFFVKtYt4Ji6pk6vzr1MsOs6h7uT7rT8dbN2oRUnx7k0bhYe1d8sMiM0sT36jvt8ygJUaB0ZRNCIbzh/mUKfj9QYWv203TuiRd/RBNtceRewZsZbRS3aaPdv9J6z+8Is2Jz2lmHuj8VsxBfeY66K3kgL0jOwmF+99Bm53slmF2VPseTonW49ODNPYb7u5tTPTljtFWX7bb/o=",
   "signature": "MIAGCSqGSIb3DQEHAqCAMIACAQExDTALBglghkgBZQMEAgEwgAYJKoZIhvcNAQcBAACggDCCA+MwggOIoAMCAQICCEwwQUlRnVQ2MAoGCCqGSM49BAMCMHoxLjAsBgNVBAMMJUFwcGxlIEFwcGxpY2F0aW9uIEludGVncmF0aW9uIENBIC0gRzMxJjAkBgNVBAsMHUFwcGxlIENlcnRpZmljYXRpb24gQXV0aG9yaXR5MRMwEQYDVQQKDApBcHBsZSBJbmMuMQswCQYDVQQGEwJVUzAeFw0xOTA1MTgwMTMyNTdaFw0yNDA1MTYwMTMyNTdaMF8xJTAjBgNVBAMMHGVjYy1zbXAtYnJva2VyLXNpZ25fVUM0LVBST0QxFDASBgNVBAsMC2lPUyBTeXN0ZW1zMRMwEQYDVQQKDApBcHBsZSBJbmMuMQswCQYDVQQGEwJVUzBZMBMGByqGSM49AgEGCCqGSM49AwEHA0IABMIVd+3r1seyIY9o3XCQoSGNx7C9bywoPYRgldlK9KVBG4NCDtgR80B+gzMfHFTD9+syINa61dTv9JKJiT58DxOjggIRMIICDTAMBgNVHRMBAf8EAjAAMB8GA1UdIwQYMBaAFCPyScRPk+TvJ+bE9ihsP6K7/S5LMEUGCCsGAQUFBwEBBDkwNzA1BggrBgEFBQcwAYYpaHR0cDovL29jc3AuYXBwbGUuY29tL29jc3AwNC1hcHBsZWFpY2EzMDIwggEdBgNVHSAEggEUMIIBEDCCAQwGCSqGSIb3Y2QFATCB/jCBwwYIKwYBBQUHAgIwgbYMgbNSZWxpYW5jZSBvbiB0aGlzIGNlcnRpZmljYXRlIGJ5IGFueSBwYXJ0eSBhc3N1bWVzIGFjY2VwdGFuY2Ugb2YgdGhlIHRoZW4gYXBwbGljYWJsZSBzdGFuZGFyZCB0ZXJtcyBhbmQgY29uZGl0aW9ucyBvZiB1c2UsIGNlcnRpZmljYXRlIHBvbGljeSBhbmQgY2VydGlmaWNhdGlvbiBwcmFjdGljZSBzdGF0ZW1lbnRzLjA2BggrBgEFBQcCARYqaHR0cDovL3d3dy5hcHBsZS5jb20vY2VydGlmaWNhdGVhdXRob3JpdHkvMDQGA1UdHwQtMCswKaAnoCWGI2h0dHA6Ly9jcmwuYXBwbGUuY29tL2FwcGxlYWljYTMuY3JsMB0GA1UdDgQWBBSUV9tv1XSBhomJdi9+V4UH55tYJDAOBgNVHQ8BAf8EBAMCB4AwDwYJKoZIhvdjZAYdBAIFADAKBggqhkjOPQQDAgNJADBGAiEAvglXH+ceHnNbVeWvrLTHL+tEXzAYUiLHJRACth69b1UCIQDRizUKXdbdbrF0YDWxHrLOh8+j5q9svYOAiQ3ILN2qYzCCAu4wggJ1oAMCAQICCEltL786mNqXMAoGCCqGSM49BAMCMGcxGzAZBgNVBAMMEkFwcGxlIFJvb3QgQ0EgLSBHMzEmMCQGA1UECwwdQXBwbGUgQ2VydGlmaWNhdGlvbiBBdXRob3JpdHkxEzARBgNVBAoMCkFwcGxlIEluYy4xCzAJBgNVBAYTAlVTMB4XDTE0MDUwNjIzNDYzMFoXDTI5MDUwNjIzNDYzMFowejEuMCwGA1UEAwwlQXBwbGUgQXBwbGljYXRpb24gSW50ZWdyYXRpb24gQ0EgLSBHMzEmMCQGA1UECwwdQXBwbGUgQ2VydGlmaWNhdGlvbiBBdXRob3JpdHkxEzARBgNVBAoMCkFwcGxlIEluYy4xCzAJBgNVBAYTAlVTMFkwEwYHKoZIzj0CAQYIKoZIzj0DAQcDQgAE8BcRhBnXZIXVGl4lgQd26ICi7957rk3gjfxLk+EzVtVmWzWuItCXdg0iTnu6CP12F86Iy3a7ZnC+yOgphP9URaOB9zCB9DBGBggrBgEFBQcBAQQ6MDgwNgYIKwYBBQUHMAGGKmh0dHA6Ly9vY3NwLmFwcGxlLmNvbS9vY3NwMDQtYXBwbGVyb290Y2FnMzAdBgNVHQ4EFgQUI/JJxE+T5O8n5sT2KGw/orv9LkswDwYDVR0TAQH/BAUwAwEB/zAfBgNVHSMEGDAWgBS7sN6hWDOImqSKmd6+veuv2sskqzA3BgNVHR8EMDAuMCygKqAohiZodHRwOi8vY3JsLmFwcGxlLmNvbS9hcHBsZXJvb3RjYWczLmNybDAOBgNVHQ8BAf8EBAMCAQYwEAYKKoZIhvdjZAYCDgQCBQAwCgYIKoZIzj0EAwIDZwAwZAIwOs9yg1EWmbGG+zXDVspiv/QX7dkPdU2ijr7xnIFeQreJ+Jj3m1mfmNVBDY+d6cL+AjAyLdVEIbCjBXdsXfM4O5Bn/Rd8LCFtlk/GcmmCEm9U+Hp9G5nLmwmJIWEGmQ8Jkh0AADGCAYgwggGEAgEBMIGGMHoxLjAsBgNVBAMMJUFwcGxlIEFwcGxpY2F0aW9uIEludGVncmF0aW9uIENBIC0gRzMxJjAkBgNVBAsMHUFwcGxlIENlcnRpZmljYXRpb24gQXV0aG9yaXR5MRMwEQYDVQQKDApBcHBsZSBJbmMuMQswCQYDVQQGEwJVUwIITDBBSVGdVDYwCwYJYIZIAWUDBAIBoIGTMBgGCSqGSIb3DQEJAzELBgkqhkiG9w0BBwEwHAYJKoZIhvcNAQkFMQ8XDTIzMDUyNDE5Mjc1M1owKAYJKoZIhvcNAQk0MRswGTALBglghkgBZQMEAgGhCgYIKoZIzj0EAwIwLwYJKoZIhvcNAQkEMSIEIPjM2YkgroC2//zhHgmk80KnkLlcyZRVYt38wY8L851RMAoGCCqGSM49BAMCBEcwRQIgJdU2sd49K3cplsoAMppNolR36g5ktefleZu9H4a8UV8CIQDjgkWt5ZD7n9UaHpZsvKgbdktMq6MhG60bRemX8RnqXwAAAAAAAA==",
   "header": {
      "publicKeyHash": "sVJ+hz3Jyb0eKCe276d05QHmUF5K9+HCalzkUBPQ9YE=",
      "ephemeralPublicKey": "MFkwEwYHKoZIzj0CAQYIKoZIzj0DAQcDQgAEOuabaFAe9UQlHceNRNrlhef+lpW/Xuwk/sOmttK0iCt2hJqgqiq/b/ZDN2RjzRlTEXWlFAMkMf6O3f4cxK9tUg==",
      "transactionId": "c82114434378b3372d2c739b91c2d08d3e79038bcd0cff37dbf220a57a9e69cf"
   }
}
and sent to Klix as a form field token value
ewogICAiZGF0YSI6ICJCZ3B1Wk9UQXdmdmNLTGpUZUViMktSeDdsemo1b3ZTRlU5ZFhPZU5POHNpTVZOWVIrVHlyVGdjc1IzbTJmMWpvTG5wUmdpK1RoVzdaN3VKdkJlYVE5bzFic01MN2RNa3U3bmNzMFlDcUEwTTJYemMwalRUWGlRUGR2YncwK2tCZEpFRkd1L1owcXJTbFA1UWtUdU1JU3d4ekxzOVphWkJwZ1dzdWhnS3ZXNEZnM0NpNmlnZlpQYkNxeTVpc3oxTTQ4TUdEVUJjMUFvM3kydVUrMkdnMXRHVGpVRDRkbDhDUGxMaVhGRlZLdFl0NEppNnBrNnZ6cjFNc09zNmg3dVQ3clQ4ZGJOMm9SVW54N2swYmhZZTFkOHNNaU0wc1QzNmp2dDh5Z0pVYUIwWlJOQ0liemgvbVVLZmo5UVlXdjIwM1R1aVJkL1JCTnRjZVJld1pzWmJSUzNhYVBkdjlKNnorOElzMkp6MmxtSHVqOFZzeEJmZVk2Nksza2dMMGpPd21GKzk5Qm01M3NsbUYyVlBzZVRvblc0OU9ETlBZYjd1NXRUUFRsanRGV1g3YmIvbz0iLAogICAic2lnbmF0dXJlIjogIk1JQUdDU3FHU0liM0RRRUhBcUNBTUlBQ0FRRXhEVEFMQmdsZ2hrZ0JaUU1FQWdFd2dBWUpLb1pJaHZjTkFRY0JBQUNnZ0RDQ0ErTXdnZ09Jb0FNQ0FRSUNDRXd3UVVsUm5WUTJNQW9HQ0NxR1NNNDlCQU1DTUhveExqQXNCZ05WQkFNTUpVRndjR3hsSUVGd2NHeHBZMkYwYVc5dUlFbHVkR1ZuY21GMGFXOXVJRU5CSUMwZ1J6TXhKakFrQmdOVkJBc01IVUZ3Y0d4bElFTmxjblJwWm1sallYUnBiMjRnUVhWMGFHOXlhWFI1TVJNd0VRWURWUVFLREFwQmNIQnNaU0JKYm1NdU1Rc3dDUVlEVlFRR0V3SlZVekFlRncweE9UQTFNVGd3TVRNeU5UZGFGdzB5TkRBMU1UWXdNVE15TlRkYU1GOHhKVEFqQmdOVkJBTU1IR1ZqWXkxemJYQXRZbkp2YTJWeUxYTnBaMjVmVlVNMExWQlNUMFF4RkRBU0JnTlZCQXNNQzJsUFV5QlRlWE4wWlcxek1STXdFUVlEVlFRS0RBcEJjSEJzWlNCSmJtTXVNUXN3Q1FZRFZRUUdFd0pWVXpCWk1CTUdCeXFHU000OUFnRUdDQ3FHU000OUF3RUhBMElBQk1JVmQrM3Ixc2V5SVk5bzNYQ1FvU0dOeDdDOWJ5d29QWVJnbGRsSzlLVkJHNE5DRHRnUjgwQitnek1mSEZURDkrc3lJTmE2MWRUdjlKS0ppVDU4RHhPamdnSVJNSUlDRFRBTUJnTlZIUk1CQWY4RUFqQUFNQjhHQTFVZEl3UVlNQmFBRkNQeVNjUlBrK1R2SitiRTlpaHNQNks3L1M1TE1FVUdDQ3NHQVFVRkJ3RUJCRGt3TnpBMUJnZ3JCZ0VGQlFjd0FZWXBhSFIwY0RvdkwyOWpjM0F1WVhCd2JHVXVZMjl0TDI5amMzQXdOQzFoY0hCc1pXRnBZMkV6TURJd2dnRWRCZ05WSFNBRWdnRVVNSUlCRURDQ0FRd0dDU3FHU0liM1kyUUZBVENCL2pDQnd3WUlLd1lCQlFVSEFnSXdnYllNZ2JOU1pXeHBZVzVqWlNCdmJpQjBhR2x6SUdObGNuUnBabWxqWVhSbElHSjVJR0Z1ZVNCd1lYSjBlU0JoYzNOMWJXVnpJR0ZqWTJWd2RHRnVZMlVnYjJZZ2RHaGxJSFJvWlc0Z1lYQndiR2xqWVdKc1pTQnpkR0Z1WkdGeVpDQjBaWEp0Y3lCaGJtUWdZMjl1WkdsMGFXOXVjeUJ2WmlCMWMyVXNJR05sY25ScFptbGpZWFJsSUhCdmJHbGplU0JoYm1RZ1kyVnlkR2xtYVdOaGRHbHZiaUJ3Y21GamRHbGpaU0J6ZEdGMFpXMWxiblJ6TGpBMkJnZ3JCZ0VGQlFjQ0FSWXFhSFIwY0RvdkwzZDNkeTVoY0hCc1pTNWpiMjB2WTJWeWRHbG1hV05oZEdWaGRYUm9iM0pwZEhrdk1EUUdBMVVkSHdRdE1Dc3dLYUFub0NXR0kyaDBkSEE2THk5amNtd3VZWEJ3YkdVdVkyOXRMMkZ3Y0d4bFlXbGpZVE11WTNKc01CMEdBMVVkRGdRV0JCU1VWOXR2MVhTQmhvbUpkaTkrVjRVSDU1dFlKREFPQmdOVkhROEJBZjhFQkFNQ0I0QXdEd1lKS29aSWh2ZGpaQVlkQkFJRkFEQUtCZ2dxaGtqT1BRUURBZ05KQURCR0FpRUF2Z2xYSCtjZUhuTmJWZVd2ckxUSEwrdEVYekFZVWlMSEpSQUN0aDY5YjFVQ0lRRFJpelVLWGRiZGJyRjBZRFd4SHJMT2g4K2o1cTlzdllPQWlRM0lMTjJxWXpDQ0F1NHdnZ0oxb0FNQ0FRSUNDRWx0TDc4Nm1OcVhNQW9HQ0NxR1NNNDlCQU1DTUdjeEd6QVpCZ05WQkFNTUVrRndjR3hsSUZKdmIzUWdRMEVnTFNCSE16RW1NQ1FHQTFVRUN3d2RRWEJ3YkdVZ1EyVnlkR2xtYVdOaGRHbHZiaUJCZFhSb2IzSnBkSGt4RXpBUkJnTlZCQW9NQ2tGd2NHeGxJRWx1WXk0eEN6QUpCZ05WQkFZVEFsVlRNQjRYRFRFME1EVXdOakl6TkRZek1Gb1hEVEk1TURVd05qSXpORFl6TUZvd2VqRXVNQ3dHQTFVRUF3d2xRWEJ3YkdVZ1FYQndiR2xqWVhScGIyNGdTVzUwWldkeVlYUnBiMjRnUTBFZ0xTQkhNekVtTUNRR0ExVUVDd3dkUVhCd2JHVWdRMlZ5ZEdsbWFXTmhkR2x2YmlCQmRYUm9iM0pwZEhreEV6QVJCZ05WQkFvTUNrRndjR3hsSUVsdVl5NHhDekFKQmdOVkJBWVRBbFZUTUZrd0V3WUhLb1pJemowQ0FRWUlLb1pJemowREFRY0RRZ0FFOEJjUmhCblhaSVhWR2w0bGdRZDI2SUNpNzk1N3JrM2dqZnhMaytFelZ0Vm1Xeld1SXRDWGRnMGlUbnU2Q1AxMkY4Nkl5M2E3Wm5DK3lPZ3BoUDlVUmFPQjl6Q0I5REJHQmdnckJnRUZCUWNCQVFRNk1EZ3dOZ1lJS3dZQkJRVUhNQUdHS21oMGRIQTZMeTl2WTNOd0xtRndjR3hsTG1OdmJTOXZZM053TURRdFlYQndiR1Z5YjI5MFkyRm5NekFkQmdOVkhRNEVGZ1FVSS9KSnhFK1Q1TzhuNXNUMktHdy9vcnY5TGtzd0R3WURWUjBUQVFIL0JBVXdBd0VCL3pBZkJnTlZIU01FR0RBV2dCUzdzTjZoV0RPSW1xU0ttZDYrdmV1djJzc2txekEzQmdOVkhSOEVNREF1TUN5Z0txQW9oaVpvZEhSd09pOHZZM0pzTG1Gd2NHeGxMbU52YlM5aGNIQnNaWEp2YjNSallXY3pMbU55YkRBT0JnTlZIUThCQWY4RUJBTUNBUVl3RUFZS0tvWklodmRqWkFZQ0RnUUNCUUF3Q2dZSUtvWkl6ajBFQXdJRFp3QXdaQUl3T3M5eWcxRVdtYkdHK3pYRFZzcGl2L1FYN2RrUGRVMmlqcjd4bklGZVFyZUorSmozbTFtZm1OVkJEWStkNmNMK0FqQXlMZFZFSWJDakJYZHNYZk00TzVCbi9SZDhMQ0Z0bGsvR2NtbUNFbTlVK0hwOUc1bkxtd21KSVdFR21ROEpraDBBQURHQ0FZZ3dnZ0dFQWdFQk1JR0dNSG94TGpBc0JnTlZCQU1NSlVGd2NHeGxJRUZ3Y0d4cFkyRjBhVzl1SUVsdWRHVm5jbUYwYVc5dUlFTkJJQzBnUnpNeEpqQWtCZ05WQkFzTUhVRndjR3hsSUVObGNuUnBabWxqWVhScGIyNGdRWFYwYUc5eWFYUjVNUk13RVFZRFZRUUtEQXBCY0hCc1pTQkpibU11TVFzd0NRWURWUVFHRXdKVlV3SUlUREJCU1ZHZFZEWXdDd1lKWUlaSUFXVURCQUlCb0lHVE1CZ0dDU3FHU0liM0RRRUpBekVMQmdrcWhraUc5dzBCQndFd0hBWUpLb1pJaHZjTkFRa0ZNUThYRFRJek1EVXlOREU1TWpjMU0xb3dLQVlKS29aSWh2Y05BUWswTVJzd0dUQUxCZ2xnaGtnQlpRTUVBZ0doQ2dZSUtvWkl6ajBFQXdJd0x3WUpLb1pJaHZjTkFRa0VNU0lFSVBqTTJZa2dyb0MyLy96aEhnbWs4MEtua0xsY3laUlZZdDM4d1k4TDg1MVJNQW9HQ0NxR1NNNDlCQU1DQkVjd1JRSWdKZFUyc2Q0OUszY3Bsc29BTXBwTm9sUjM2ZzVrdGVmbGVadTlINGE4VVY4Q0lRRGpna1d0NVpEN245VWFIcFpzdktnYmRrdE1xNk1oRzYwYlJlbVg4Um5xWHdBQUFBQUFBQT09IiwKICAgImhlYWRlciI6IHsKICAgICAgInB1YmxpY0tleUhhc2giOiAic1ZKK2h6M0p5YjBlS0NlMjc2ZDA1UUhtVUY1SzkrSENhbHprVUJQUTlZRT0iLAogICAgICAiZXBoZW1lcmFsUHVibGljS2V5IjogIk1Ga3dFd1lIS29aSXpqMENBUVlJS29aSXpqMERBUWNEUWdBRU91YWJhRkFlOVVRbEhjZU5STnJsaGVmK2xwVy9YdXdrL3NPbXR0SzBpQ3QyaEpxZ3FpcS9iL1pETjJSanpSbFRFWFdsRkFNa01mNk8zZjRjeEs5dFVnPT0iLAogICAgICAidHJhbnNhY3Rpb25JZCI6ICJjODIxMTQ0MzQzNzhiMzM3MmQyYzczOWI5MWMyZDA4ZDNlNzkwMzhiY2QwY2ZmMzdkYmYyMjBhNTdhOWU2OWNmIgogICB9Cn0=
Google Pay token example
Given payment data obtained from Google Pay:
{
    "apiVersionMinor": 0,
    "apiVersion": 2,
    "paymentMethodData": {
        "description": "Visa•••1111",
        "tokenizationData": {
            "type": "PAYMENT_GATEWAY",
            "token": "{\"signature\":\"MEYCIQDHUpR5xlu0wp0q3JdkYafwE0otpsRQ1ljF+FXHPXGdcAIhANIFbzZ3DVuNxAzDllI/AkW/lnM2NgrAEfrF+Cty38/8\",\"intermediateSigningKey\":{\"signedKey\":\"{\\\"keyValue\\\":\\\"MFkwEwYHKoZIzj0CAQYIKoZIzj0DAQcDQgAEJ66kcxuM0H1OBBzzsLjzSjlA5HShjK7MqaLNeggofGvcsH4KhKtfE4W4SIPXHRSJHeQsq+oO/vj4t4oBwaPEIA\\\\u003d\\\\u003d\\\",\\\"keyExpiration\\\":\\\"1708691731258\\\"}\",\"signatures\":[\"MEQCIB7WCq8CS5M+XmVPw4fHn6MD/CbNYyEbOT/0+t/UqvFGAiB5qQkbfamdWzmUPcUlZZNp7iz8HIIEkqLoUhaeA5BXuQ\\u003d\\u003d\"]},\"protocolVersion\":\"ECv2\",\"signedMessage\":\"{\\\"encryptedMessage\\\":\\\"Pqwy024PI3gbAd2+f3IRCgNM4s08yqdkrZu975/DW3hsG+RpG5NRJYjfukZaqpgZYzHGqjKcU9borN2HbCowxmPl+1ndXV6xa11/3LQg2aU1k09OipHyEEgUo3uGJpro115iktdKFSVf4A1Y8YNO+XqLJm8gMe5Q0Ro4mO6jZ7SU/sVxmPnJzPNAK/dNx2zV57H29ZMuf28F5xRk6+8ZoV4e+sgYbDCBvCLoQZmI3M++hFS6agMtJ/YkBDpTAnE+fBBgf3ST31W95IXYsDQf+iHmID8tk1/VKbf5jS3SJiRelV3sCSc/5aq9LiR/siKe0bNA4AjK5kHCee1VlMdOO8S4f+sVHd5vSJBW3WzP0DWha+xIV3f+JapPCX++bOUqtgvZaP1+q+Yg6MCTcPqKr/O0NsavdqHqm3gPW7IKXzbC8e46dPTcUwXB+Wirp0BQmVwNKUmHS1H5kgahJway3hj32P5GrNV8djer4n1BIw1uyfOF17rcXGvA8u/C4fNHaEM/hk2R7uO7OQ3iYWyo8GqJp2MmEqk3RdRh4snlkgFGFlzcntkSGmpv7WVQCchxX9d+9VEpIEgn\\\",\\\"ephemeralPublicKey\\\":\\\"BPLkfpYaBTDeIfkWIyWrHAHEmAM+PAV0dNXg23xep+nSh8tB4UDaYxs7Qmw3rnEs0qzuHY3njSoOBK7uewSaNMQ\\\\u003d\\\",\\\"tag\\\":\\\"G/2CnxBCjRLaeX2y66QV0Yln2OY/GNiV1zH/sKnQoaI\\\\u003d\\\"}\"}"
        },
        "type": "CARD",
        "info": {
            "cardNetwork": "VISA",
            "cardDetails": "1111"
        }
    }
}
this whole JSON document needs to be Base64 encoded and sent to Klix as a form field data value
ewogICAgImFwaVZlcnNpb25NaW5vciI6IDAsCiAgICAiYXBpVmVyc2lvbiI6IDIsCiAgICAicGF5bWVudE1ldGhvZERhdGEiOiB7CiAgICAgICAgImRlc2NyaXB0aW9uIjogIlZpc2HigKLigKLigKIxMTExIiwKICAgICAgICAidG9rZW5pemF0aW9uRGF0YSI6IHsKICAgICAgICAgICAgInR5cGUiOiAiUEFZTUVOVF9HQVRFV0FZIiwKICAgICAgICAgICAgInRva2VuIjogIntcInNpZ25hdHVyZVwiOlwiTUVZQ0lRREhVcFI1eGx1MHdwMHEzSmRrWWFmd0Uwb3Rwc1JRMWxqRitGWEhQWEdkY0FJaEFOSUZielozRFZ1TnhBekRsbEkvQWtXL2xuTTJOZ3JBRWZyRitDdHkzOC84XCIsXCJpbnRlcm1lZGlhdGVTaWduaW5nS2V5XCI6e1wic2lnbmVkS2V5XCI6XCJ7XFxcImtleVZhbHVlXFxcIjpcXFwiTUZrd0V3WUhLb1pJemowQ0FRWUlLb1pJemowREFRY0RRZ0FFSjY2a2N4dU0wSDFPQkJ6enNManpTamxBNUhTaGpLN01xYUxOZWdnb2ZHdmNzSDRLaEt0ZkU0VzRTSVBYSFJTSkhlUXNxK29PL3ZqNHQ0b0J3YVBFSUFcXFxcdTAwM2RcXFxcdTAwM2RcXFwiLFxcXCJrZXlFeHBpcmF0aW9uXFxcIjpcXFwiMTcwODY5MTczMTI1OFxcXCJ9XCIsXCJzaWduYXR1cmVzXCI6W1wiTUVRQ0lCN1dDcThDUzVNK1htVlB3NGZIbjZNRC9DYk5ZeUViT1QvMCt0L1VxdkZHQWlCNXFRa2JmYW1kV3ptVVBjVWxaWk5wN2l6OEhJSUVrcUxvVWhhZUE1Qlh1UVxcdTAwM2RcXHUwMDNkXCJdfSxcInByb3RvY29sVmVyc2lvblwiOlwiRUN2MlwiLFwic2lnbmVkTWVzc2FnZVwiOlwie1xcXCJlbmNyeXB0ZWRNZXNzYWdlXFxcIjpcXFwiUHF3eTAyNFBJM2diQWQyK2YzSVJDZ05NNHMwOHlxZGtyWnU5NzUvRFczaHNHK1JwRzVOUkpZamZ1a1phcXBnWll6SEdxaktjVTlib3JOMkhiQ293eG1QbCsxbmRYVjZ4YTExLzNMUWcyYVUxazA5T2lwSHlFRWdVbzN1R0pwcm8xMTVpa3RkS0ZTVmY0QTFZOFlOTytYcUxKbThnTWU1UTBSbzRtTzZqWjdTVS9zVnhtUG5KelBOQUsvZE54MnpWNTdIMjlaTXVmMjhGNXhSazYrOFpvVjRlK3NnWWJEQ0J2Q0xvUVptSTNNKytoRlM2YWdNdEovWWtCRHBUQW5FK2ZCQmdmM1NUMzFXOTVJWFlzRFFmK2lIbUlEOHRrMS9WS2JmNWpTM1NKaVJlbFYzc0NTYy81YXE5TGlSL3NpS2UwYk5BNEFqSzVrSENlZTFWbE1kT084UzRmK3NWSGQ1dlNKQlczV3pQMERXaGEreElWM2YrSmFwUENYKytiT1VxdGd2WmFQMStxK1lnNk1DVGNQcUtyL08wTnNhdmRxSHFtM2dQVzdJS1h6YkM4ZTQ2ZFBUY1V3WEIrV2lycDBCUW1Wd05LVW1IUzFINWtnYWhKd2F5M2hqMzJQNUdyTlY4ZGplcjRuMUJJdzF1eWZPRjE3cmNYR3ZBOHUvQzRmTkhhRU0vaGsyUjd1TzdPUTNpWVd5bzhHcUpwMk1tRXFrM1JkUmg0c25sa2dGR0ZsemNudGtTR21wdjdXVlFDY2h4WDlkKzlWRXBJRWduXFxcIixcXFwiZXBoZW1lcmFsUHVibGljS2V5XFxcIjpcXFwiQlBMa2ZwWWFCVERlSWZrV0l5V3JIQUhFbUFNK1BBVjBkTlhnMjN4ZXArblNoOHRCNFVEYVl4czdRbXczcm5FczBxenVIWTNualNvT0JLN3Vld1NhTk1RXFxcXHUwMDNkXFxcIixcXFwidGFnXFxcIjpcXFwiRy8yQ254QkNqUkxhZVgyeTY2UVYwWWxuMk9ZL0dOaVYxekgvc0tuUW9hSVxcXFx1MDAzZFxcXCJ9XCJ9IgogICAgICAgIH0sCiAgICAgICAgInR5cGUiOiAiQ0FSRCIsCiAgICAgICAgImluZm8iOiB7CiAgICAgICAgICAgICJjYXJkTmV0d29yayI6ICJWSVNBIiwKICAgICAgICAgICAgImNhcmREZXRhaWxzIjogIjExMTEiCiAgICAgICAgfQogICAgfQp9
Apple Pay post Base64 encoded encrypted payment response
In case payment was successfully processed single field status is returned in response.
{
  "status": "please wait for webhook"
}
In case of failed payment response containing error_response.result: "FAILURE" is returned.
{
    "error_response": {
        "response": {
            "gatewayCode": "ACQUIRER_SYSTEM_ERROR",
            "threeDsRedirectUrl": null
        },
        "result": "FAILURE"
    }
}
Google Pay post Base64 encoded encrypted payment response
In case of Google Pay payment depending on the buyer's device two different responses can be returned. In case payment was successfully processed single field status is returned in response.
{
  "status": "please wait for webhook"
}
In case field threeDsRedirectUrl is returned in response customer should be redirected to this URL to pass 3DS authentication.
{
        "merchant": "******",
        "order": {
            "amount": 0.01,
            "creationTime": 1730440058.759529,
            "currency": "EUR",
            "id": "10407955-21cb-475c-87bb-efe72541fb9d",
            "lastUpdatedTime": 1730440058.75953,
            "totalRefundedAmount": 0,
            "totalAuthorizedAmount": 0.01,
            "totalCapturedAmount": 0.01,
            "totalDisbursedAmount": 0.01,
            "merchantCurrency": "EUR"
        },
        "response": {
            "gatewayCode": "APPROVED",
            "threeDsRedirectUrl": "<3DS redirect URL>"
        },
        "result": "SUCCESS",
        "transaction": {
            "id": "10407955-21cb-475c-87bb-efe72541fb9d",
            "amount": 0.01,
            "currency": "EUR",
            "type": "CAPTURE",
            "retRefNr": "430605133628"
        }
    }
In case of failed payment response containing error_response.result: "FAILURE" is returned.
{
    "error_response": {
        "response": {
            "gatewayCode": "ACQUIRER_SYSTEM_ERROR",
            "threeDsRedirectUrl": null
        },
        "result": "FAILURE"
    }
}